Classic keyboard mod
Starting with the 30 series, ThinkPads got a new modernized keyboard and many poeple dislike it. Do not take me wrong, it is not a bad keyboard, but when compared to the older model, it has a plethora of issues. Luckily, it can be replaced with the classic 10–20 series keyboard.
Interesting references:
- My old talk about ThinkPad modding at LinuxDays in Prague (Czech)
- My updated talk presented in 2019 (Czech)
Things wrong with the new keyboard
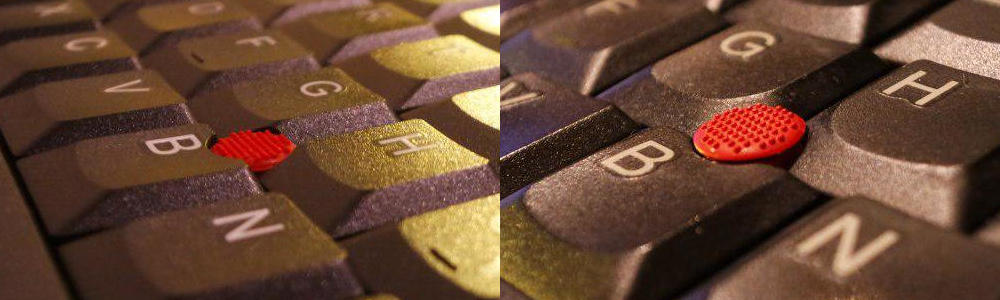
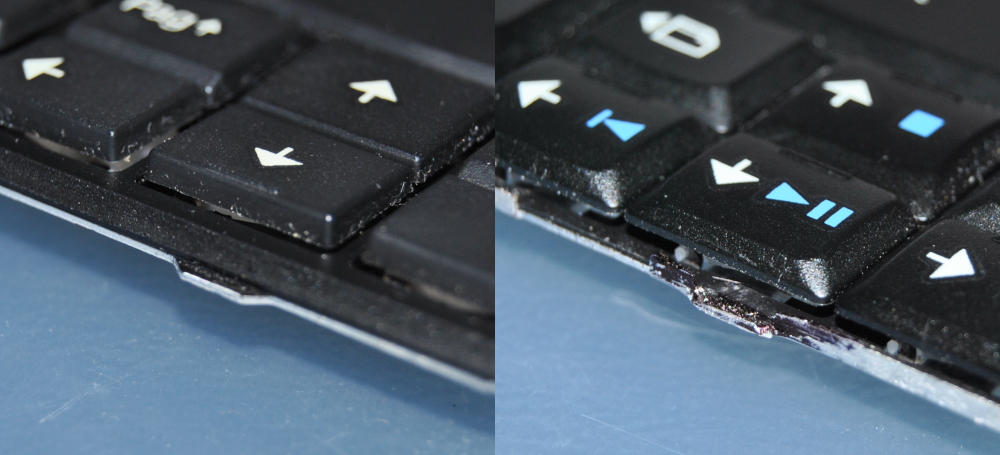
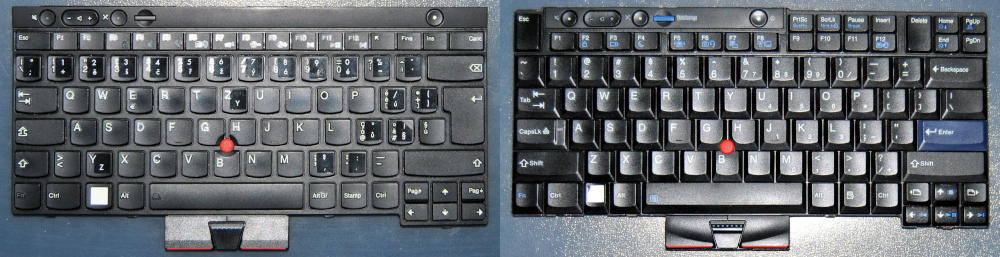 New keyboard on the left, classic keyboard on the right.
The main difference is that the new keyboard has very different “island” or “chicklet” keys. They are all separated from each other and form “islands”, hence “island-style” keyboard. This new design has less travel distance than the old keys had.
The worst change, in my opinion, is the new layout. Look at the Delete, Home, Pg*, End area on the old keyboard and compare it to the new layout. It has disappeared completely and is now a single row. I am unable to hit the correct keys when not looking at the keyboard.
Also, where are my multimedia Fn keys?! Why would Lenovo decide to move them to the F row? I guess I am just used to it and it is not really that big of a deal, but it bugs me.
Actually, several models of the new keyboard have backlight. Some people I know quite like this feature. Fun fact: the 30 series are the only ThinkPads which have both keyboard backlight and ThinkLight.
Sourcing the keyboard
If you have an older ThinkPad (xx10 or xx20), you can take the keyboard out of that. Otherwise you will have to buy a spare. There are three classic keyboard manufacturers: NMB, Alps and Chicony.
Every keyboard has it’s FRU – Field Replacement Unit number – by which you can identify any part. It can tell you which manufacturer made it and what layout it has. Here is a table of FRUs for the US ANSI layout:
| Manufacturer | Country | FRU |
|---|---|---|
| NMB | Japan | 45N2211 |
| Alps | Korea | 45N2070 |
| Chicony | China | 45N2141 |
You can read a full list of all FRUs, as found in the x220 hardware maintenance manual on pages 125–126 and the Lenovo support site (The official website has been taken down, so the anchor links to an archive).
Comparing manufacturers
I have tried using keyboards from all three manufacturers and I can safely say that NMB is the best of the three. You will have to take my word for it, but this opinion is shared among many people I discussed this with, though in general, the hype is way too overblown.
Alps is just a mushy mess with no tactile feeling and poor quality. Chicony is pretty nice, but their keyboards are inconsistent and you can end up with a well-feeling piece or a crappy one. NMB has by far the best feeling, build quality and is consistent, but in my opinion, it is not worth the stupidly large price or the trouble of trying to find a nice piece. The main difference are the switches:
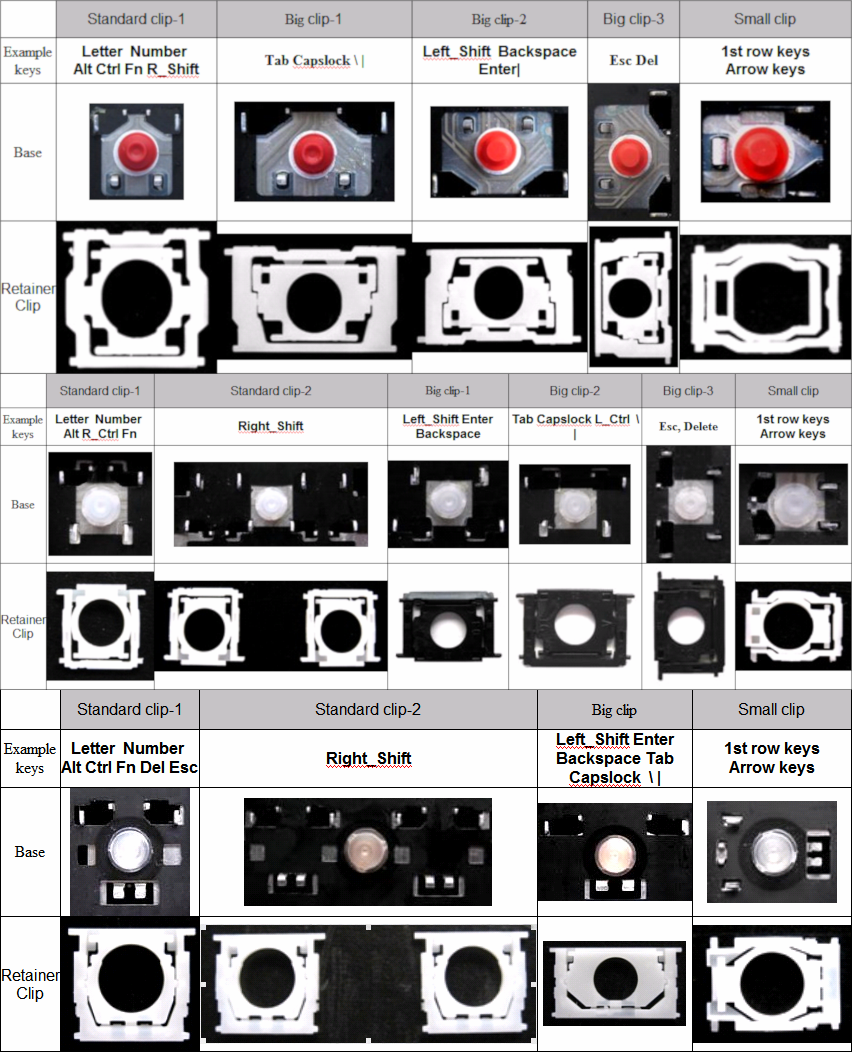 From top to bottom: NMB, Chicony, Alps. NMB can be easily recognized by the red rubber domes.
Fake keyboards
The hardest part of this whole endeavor is finding a genuine keyboard. To be honest, finding a real keyboard can be a challenge, since there have been some “fake” keyboards appearing on eBay. They may even have some weird coating which comes off after rubbing the keys.
Videos and images of the fake keyboard are from @kirbychan. As he had said:
I guess it’s more of a bait, or some refurbished shit which went wrong and somehow ended up coating the keys with kensur chinks plastic.
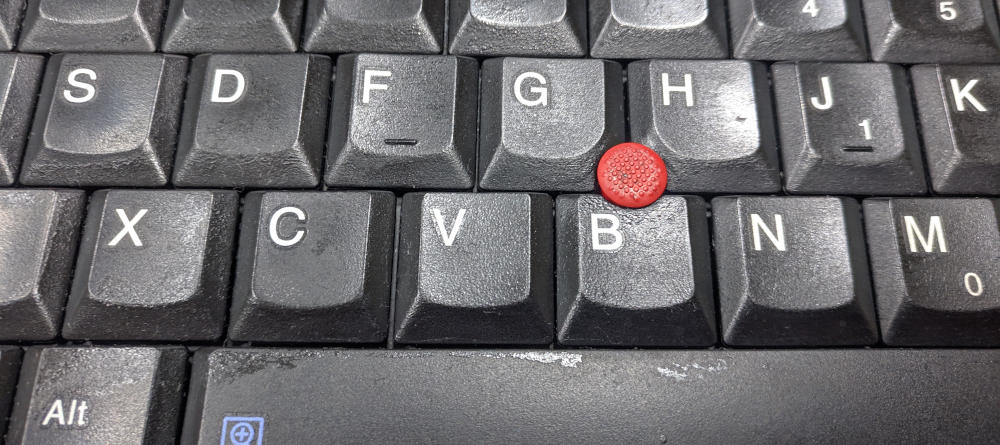
Some fake keyboards have a really low quality switches and the printed letters are misaligned. You can tell that you have a fake keyboard by looking at the middle trackpoint button blue points, which are usually smaller on the fake.
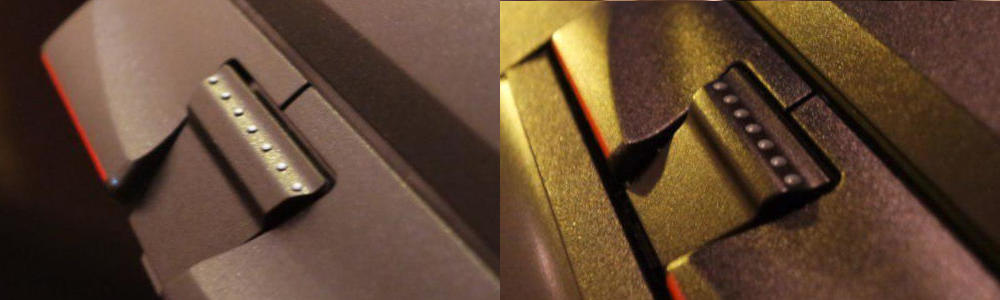
The trackpoint dome is also placed below the actual keys on the fake keyboard and therefore is pretty unusable.
List of confirmed sellers selling fakes:
- Shop3905046 (AliExpress)
- nuflower2009 (eBay)
I have no idea how to avoid these completely except buying used keyboards.
Buying keyboards
It is pretty hard to find anything but Chicony (or a fake). Lenovo even re-branded some Chicony keyboards to 45N2211 (NMB). As far as I know, there are no new NMB keyboards and you have to buy them used and taken out of broken machines. As I have said before, it is not worth the hassle and a much more common Chicony will be fine.
If you are set on getting NMB, look for listings that do not have the generic picture as any other seller, always check the picture for the correct FRU and Always send a message to the seller asking about the FRU! This goes for both eBay and AliExpress.
Isolating backlight power
If you don’t want to kill your new keyboard, it is necessary to isolate pins which deliver high current to the modern keyboard backlight. Since the old keyboard does not have backlight, it will overheat and melt. If you are lucky, it will burn in a way which disconnects the pins, but usually it just destroys the cable.
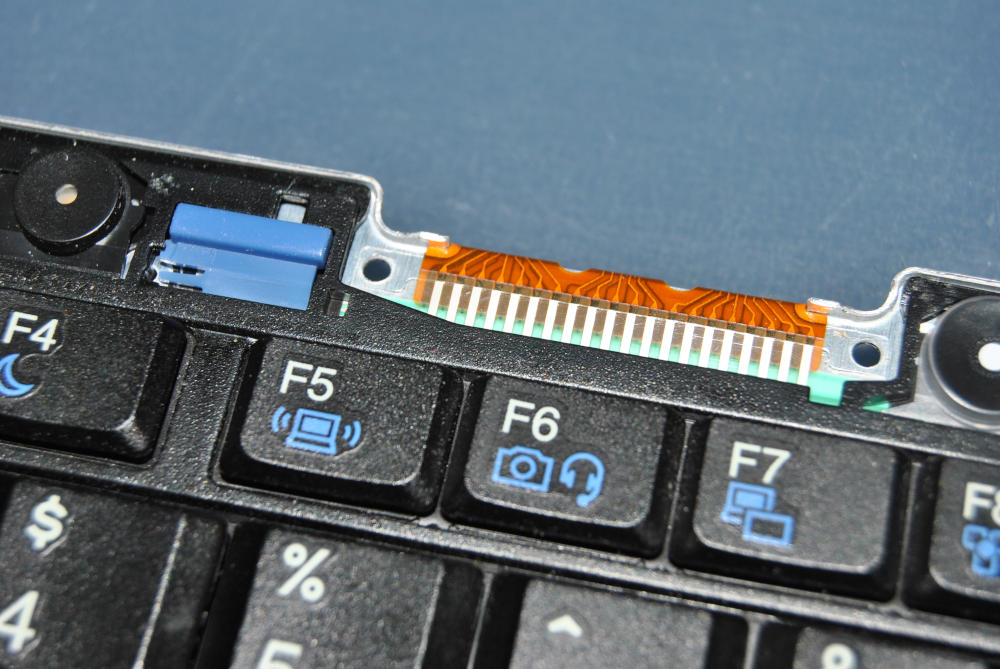
Disassemble the part holding the cable in place. It is a tight fit, so be careful not to tear anything and do not lose any screws. Pull out the cable sandwich from there. It is necessary to isolate pins 25 and 29 according to a schematic found on our favourite forum.
I used a piece of electrical tape and covered pins 25, 27 and 29 – three pins next to each other. Pin 27 is a redundant ground connection, so covering it does not hurt anything and it makes it easier to isolate the others.
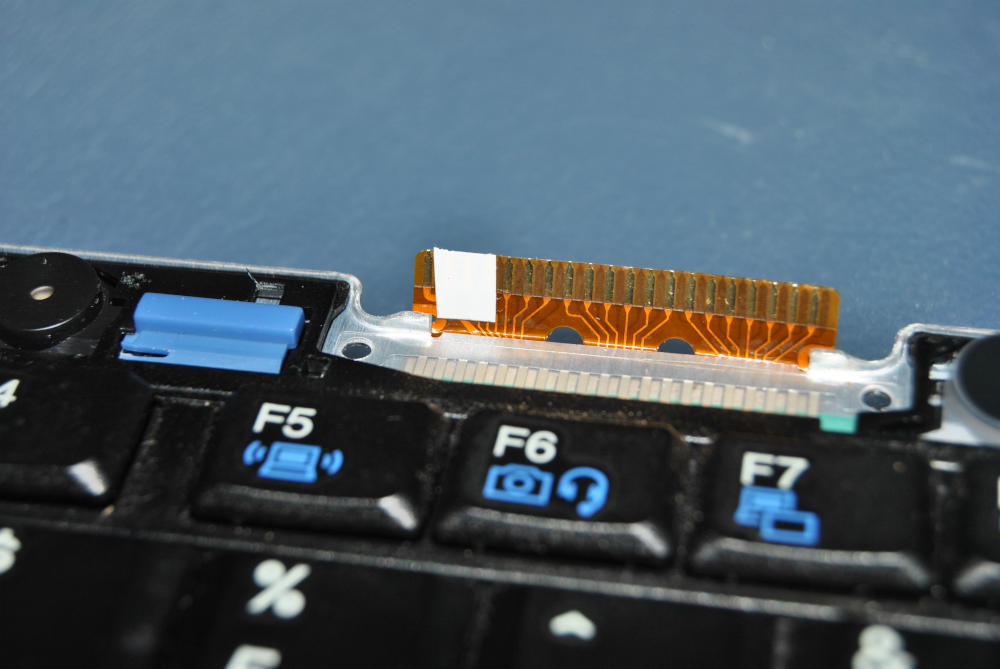
Put it back together and tighten the assembly back. Make sure you have a good quality tape, because cheap tape tends to slide around during reassembly. Best bet would be to use a piece of kapton tape. Also make sure that you did not cover the neighbouring pins, which will cause the middle trackpoint button not to function. The same may be caused by a thick tape as well, as the pins would not get a proper connection when reassembled back
Swapping the keyboard
There is a difference in thickness of the front mounting pins. Since the X230 and T430 have different keyboard mounting methods, this section is split for both machines respectively.
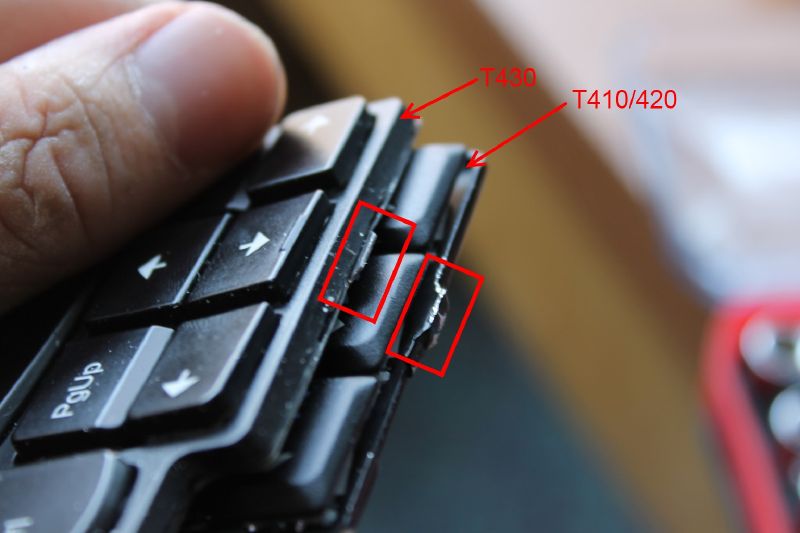 Image sourced from ThinkWiki.
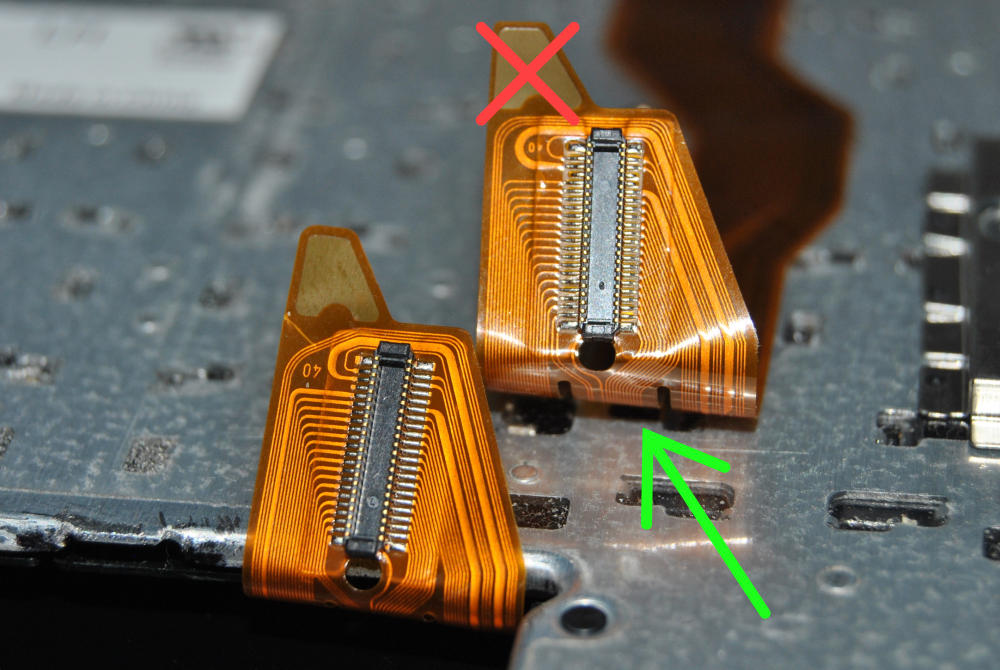
The new and old keyboards both use the same motherboard connector, so no modification is necessary there. Be careful though when pulling the connector out of the motherboard, since the cable likes to tear! I suggest pulling it by the part shown by the green arrow, not at the red cross.
T430
The T430 has the keyboard secured in the chassis itself and the slots are made for the new keyboard, so a physical modification of the nubs is necessary in order to fit.
I usually take a small dremel and file them down. You will have to get rid of the nub next to the trackpoint keys completely since there is no mounting hole for it. I then paint the filed-down spots with a black permanent marker.
Be careful not to hit any keys, especially the middle trackpoint key. It has two little mounting legs which like to snap off. If you manage to screw it up, take a look at my article about fixing it.
You might have read on ThinkWiki, that you can buy a palmrest from T420 and swap it in as well. IT DOES NOT FIT!!! Do not waste money on this. They recently fixed it on the wiki, but some people still spread this myth.
You might have also read the popular Definitive T430 Modding Guide where George Kushnir suggests this:
While most guides will point you towards either taking a dremel to the nubs or replacing the palmrest, you can actually place the keyboard under the palmrest, omit the two screws next to the touchpad, and simply drop in the keyboard and palmrest assembly together for a near perfect fit.
What the fuck?! Just do it properly and avoid this shitty advice. He even mentions the non-working palmrest swap.
X230
Unlike the T430, you will have to buy a spare X220 palmrest. The X220 and X230 palmrests can be swapped without problems. The keyboard does not mount into slots on the chassis, but instead is held only by the palmrest itself. In case you do not want to buy a new palmrest, you can cut larger holes in the X230 palmrest or file down the nubs, as you would with the T430.
You can either buy an original Lenovo palmrest with proper insulation, or you can get a Chinese clone. I must say that the clones are pretty ok, but if you want top-quality stuff, go for the better, albeit pricey, original Lenovo palmrest.
Flashing EC firmware
Lenovo changed not only the physical layout, but the software key-map as well. Because of this, many Fn combos are not working properly. This can be fixed by flashing a custom EC firmware with a modified key-map. This is not BIOS flashing as many suggest.
If you would like to know more about this, watch a talk by Hamish Coleman about how he reverse-engineered the firmware and the key-map. I will not go in-depth about this here.
There are several approaches to flashing the EC firmware, such as using an external flasher and writing directly to the EEPROM. There is a simple method though – booting a pre-made DOS-based flash tool with the modified firmware. This approach is recommended by Coleman as well.
Creating a bootable USB stick
This is a short rewrite of the official instructions.
git clone https://github.com/hamishcoleman/thinkpad-ec
cd thinkpad-ec
make list_laptops
make patched.x230.img
dd if=patched.x230.img of=/dev/sdx
Beware, this will delete all data on the target device! If you mess up the disk names, you will rewrite a different storage device, perhaps even your system! You have been warned.
Flashing the firmware
First make sure that you have your battery charged and that you have AC plugged in. It will refuse to flash new firmware otherwise.
Reboot your machine and select to boot from USB. My machine refuses to boot with some cheap USB sticks, so try several if you experience this.
You should boot into the DOS flashing utility. Just follow the instructions. After it does the flash and reboots, you can boot into your system again. Test the patch by trying to invoke any Fn combo such as Fn+Space to toggle the ThinkLight.
If it does not work, you probably did not have your battery or AC plugged in. I also had problems with using dock as the power source, so use a real AC adapter instead.
Conclusion
There it is, a working classic keyboard on your 30 series ThinkPad. Only thing not working now is the green CapsLock LED. Fixing that in software is, according to Coleman, pretty complicated, if not impossible. I have a Caps indicator in my status bar, so this does not really bother me that much.
There have been some projects which tried restoring the LED by making a custom board connected to USB and controlling it via software, but they were never finished.